Christmas Sugar Cookies
Simple and fun Cookie Decorating Ideas for Christmas!
This post may contain affiliate links. Please read our disclosure policy.
Hello you guys! Today I am really excited to share with you some simple Christmas Cookie Decorating Ideas. I am not a trained or professional cookie decorator but I love decorating cookies especially during the holidays. I had so much FUN decorating these cookies. I spent my whole Sunday doing this and felt over the top after I was done with them. They just make me happy.
These are pretty simple and easy to make [provided you get the royal icing consistency right!]. I know they don’t look perfect, the royal icing doesn’t have that matte effect and all but hey I am still learning so it might take me few more years to perfect that. I have tried to do step by step pictures for few of them while rest are self explanatory.
Christmas Tree Cookies
I have made 3 different patterns and here’s how you make them.
Design 1
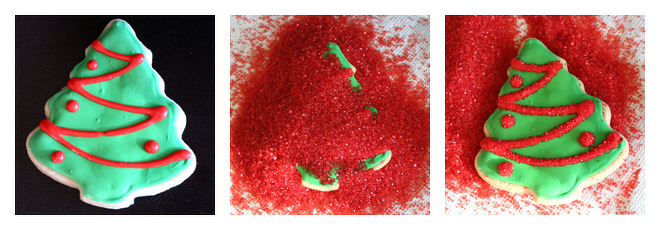
1. Flood the cookie with green color royal icing. Let it dry for 4-6 hours or overnight. Once dry pipe red garland on the Christmas tree using Wilton tip 3. Also place 4 red dots as shown in the picture.
2. Place cookie on a sheet and cover it completely with red sanding sugar.
3. Shake off the sugar and since only the red icing was wet it will become all glittery.
Design 2
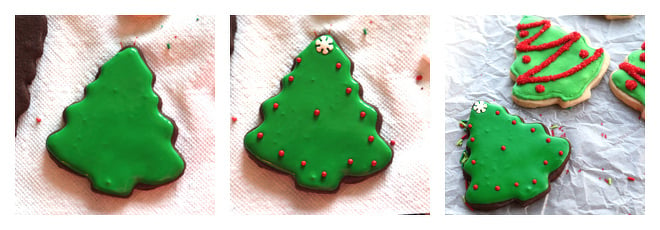
1. Flood the cookie with green royal icing.
2. Place a snowflake sprinkle on top of the tree and then place red rounds along the edges of the tree using a tweezer. Yes, you need a tweezer to make sure the sprinkles land on the exact spot you want them to. Let the cookie dry for 6 hours or overnight.
Design 3
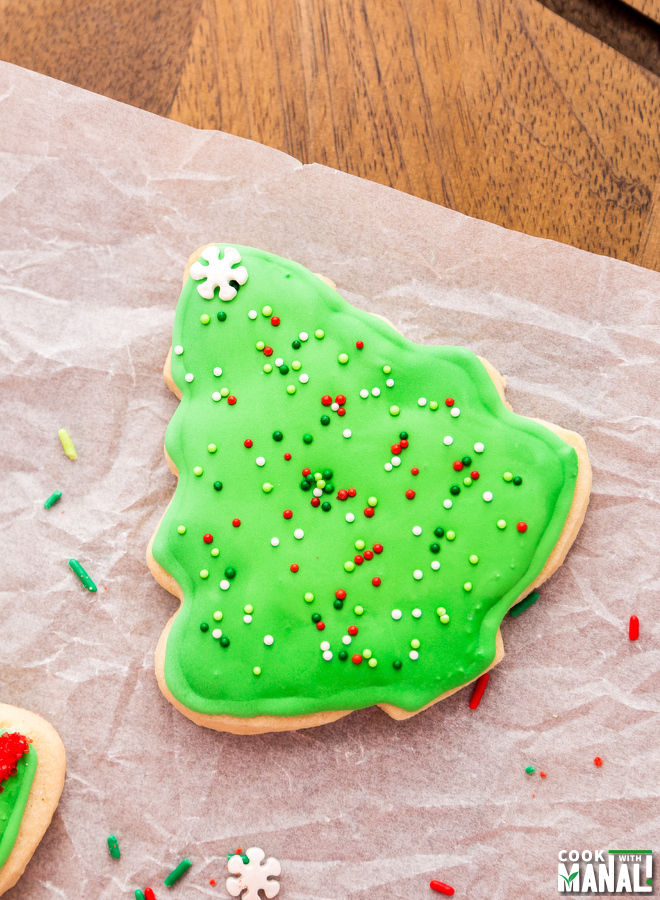
1. This is the simplest of all. Flood the cookie with green royal icing. Immediately cover it with festive sprinkles. Place a snowflake sprinkle on top of the tree.
2. Let it dry overnight.
Snowman Cookies
1. Flood the cookie with white royal icing. Let it dry for 6 hours or overnight. When dry, flood the hat area with red royal icing. Now use white icing to pipe little dots on the hat. With a food marker, mark the area for the scarf.
2. Fill the marked area with red icing, either using a round tip or if you want a more pronounced scarf, use a stiffer icing and Wilton tip 104.
3. Make small white dots on the scarf with white icing. Apply very little royal icing over the snowflake sprinkles and place them below the scarf in line. Use food marker to make the eyes and mouth. Let the cookies dry overnight.
Candy Cane Cookies
Design 1
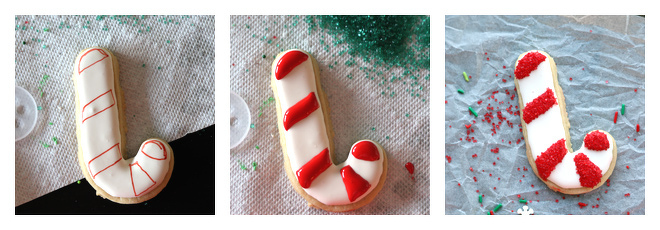
1. Flood the cookie with royal icing and let it dry for 6 hours or overnight. Once dry, mark the areas to be filled with red royal icing using a food marker.
2. Flood the marked areas with red royal icing.
3. Cover the cookie with red sanding sugar, shake off the excess. The sugar will stick to the red parts only, since it’s wet. Let dry.
The other 2 are very simple. Flood both with red royal icing. Cover one with sprinkles all over. Let the second dry for 4-6 hours. Once dry, use white royal icing to make an outline and pipe lines and dots on the candy cane.
Flower Cookies
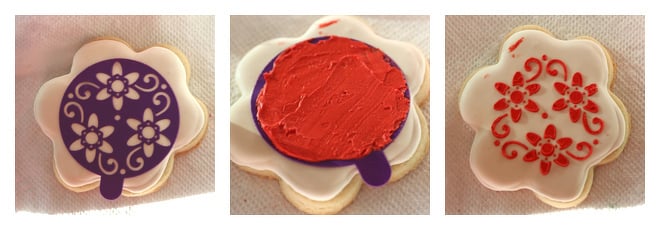
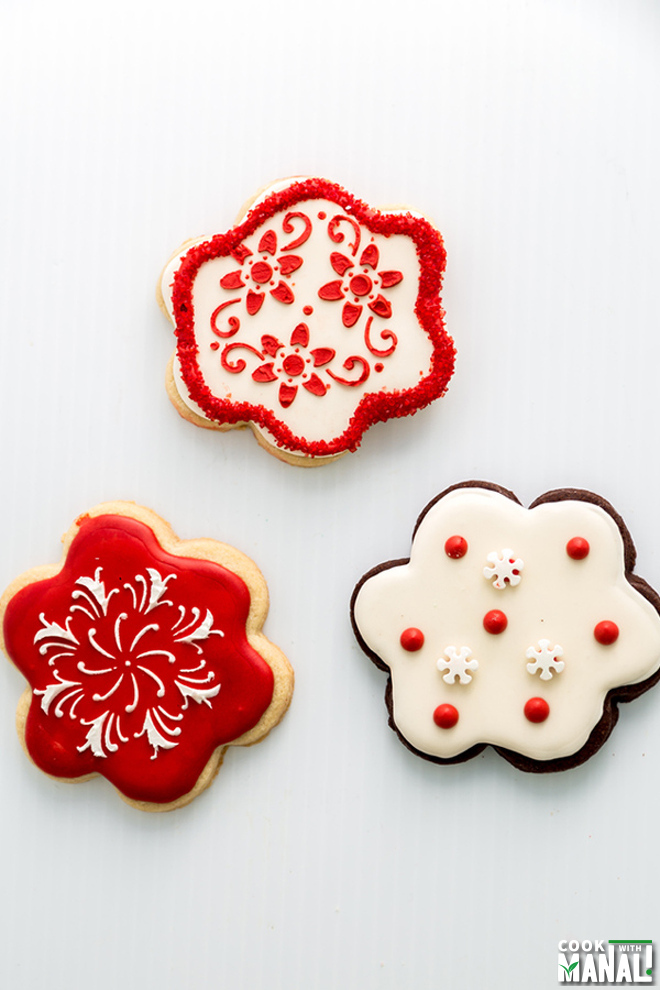
I used stencil for my flower cookies. It’s simple to use and results in beautiful designs.
1. Flood the cookie with white royal icing. Let it dry for 6 hours or overnight.
2. Place the stencil on the cookies making sure it doesn’t move when you apply the icing.
3. Apply thick royal icing all over the stencil [you can see I applied some outside the stencil too, don’t do that!]. Remove the stencil and tada you are done!
Christmas Sugar Cookies

Ingredients
Cookies
- 2¾ cup all purpose flour
- 1.25 cups granulated white sugar
- 1 cup unsalted butter room temperature
- ½ teaspoon salt
- 1 egg at room temperature
- 1.5 teaspoon vanilla extract
Royal Icing
- red food color
- green food color
Instructions
- In a bowl sift together all purpose flour and salt. Set aside.
- In the steel bowl of your stand mixer fitted with paddle attachment or using your hand mixer beat together butter and sugar till smooth and creamy, around 2 minutes.
- Add in the egg, vanilla extract and mix till combined.
- Now add the flour mix in 3 parts, mixing well after each addition.
- You will know the dough is done when it starts sticking to the paddle attachment.
- Remove dough and place it in a cling sheet.
- Wrap and refrigerate for 2 hours or overnight.
- Once chilled, roll the dough to ¼ inch thickness.
- Cut out cookies using your cookie cutters of your choice. Repeat till entire dough is finished.
- Arrange all the cookies in a baking sheet lined with parchment paper, leaving 1-2 inch space between them.
- Place the baking tray in the refrigerator for 1 hour.
- Preheat oven to 350 F degrees.
- Take out the tray from the refrigerator and bake at 350 F degrees for 9-11 minutes. The time will vary depending on the size of the cookies. My cookies were huge so I baked them for 9-11 minutes.
- Take out of the oven and let them cool down in the baking tray for 5 minutes.
- Transfer on to a wire rack to cool completely.
- Once cooled, make royal icing and decorate the cookies.
Nutrition
Nutrition information is automatically calculated, so should only be used as an approximation.
Decorated Christmas Sugar Cookies











Oh these are beautiful! I love the flour cookies and the snowmen cookies! Pinned!
Manali, all the cookies look absolutely incredible!! Beautiful detailed work on each and every cookie.. They look so pretty to eat.. 😀
Those cookies are absolutely amazing – love the detail! Looks absolutely mouthwatering! You always have such amazing ideas, and I love that first photo!
Oh, Manali! These cookies are spectacular!!! They put all my cookies to shame! This is the new bar by which I measure my decorations! So don’t laugh at my sugar cookies that I am posting in a few days, because they, umm, don’t look like yours! 🙂 Pinned!!! Absolutely stunning!
They did take a while but I had lots of fun decorating them. Thank you Stacey!
Thank you Mira!
Thank you Angie! 🙂
Thanks Savita! They are my favorite too!
Thanks you Kelly, you are so sweet!
Thanks Annie, these are pretty simple..I hardly know much…glad you find it useful!
Oh Manali, these are so pretty and so perfectly decorated. There is no way mine would come out this pretty.
Thank you Kathy! I’m sure you will do a fab job! 🙂