Salted Caramel Cinnamon Burfi
Published Aug 18, 2021
5 CommentsThis post may contain affiliate links. Please read our disclosure policy.
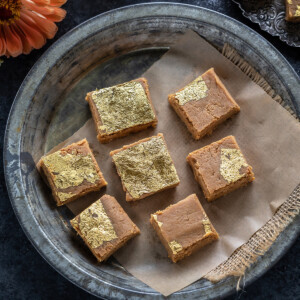
Jump right into the Indian festive season with this Salted Caramel Burfi. Melt-in-mouth burfi (fudge) made with milk powder and flavored with homemade salted caramel sauce and cinnamon.
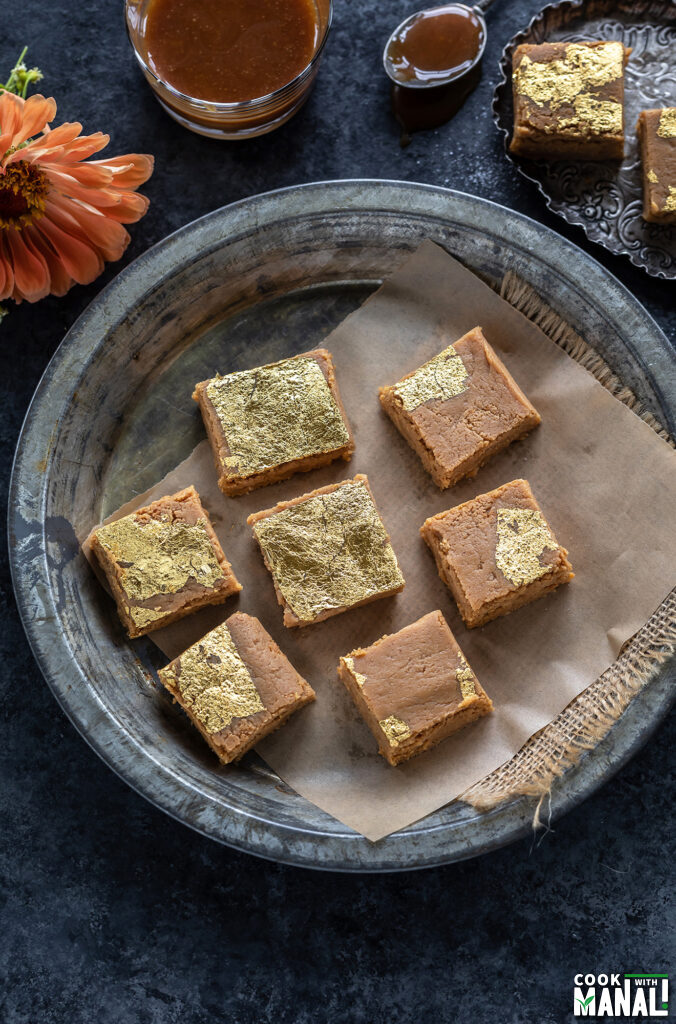
Burfis are so versatile. It’s a broad term used for a sweet Indian fudge. It can be made in so many ways with all sorts of ingredients.
Over the years, I have shared so many burfi recipes on the blog, right from Besan Burfi to Almond Burfi to even a fun take on burfi in terms of Burfi Truffles. But even after sharing so many, I still never run out of ideas to make a new flavor burfi.
Kickstarting this year’s festive season with Salted Caramel Cinnamon Burfi. If you love salted caramel and cinnamon (definitely some of my favorite fall flavors), then you will love these burfis!
Why We Love This Recipe
- easy to make with few ingredients.
- makes the perfect treat for the festive season.
- is caramel-y with touch of salt and cinnamon.
- makes wonderful edible gifts too!
It’s actually a pretty basic burfi recipe made with milk powder. But the addition of salted caramel adds a totally different flavor to it and takes it a notch up. It reminded of my nani’s peda with all the caramel-y goodness.
Ingredients
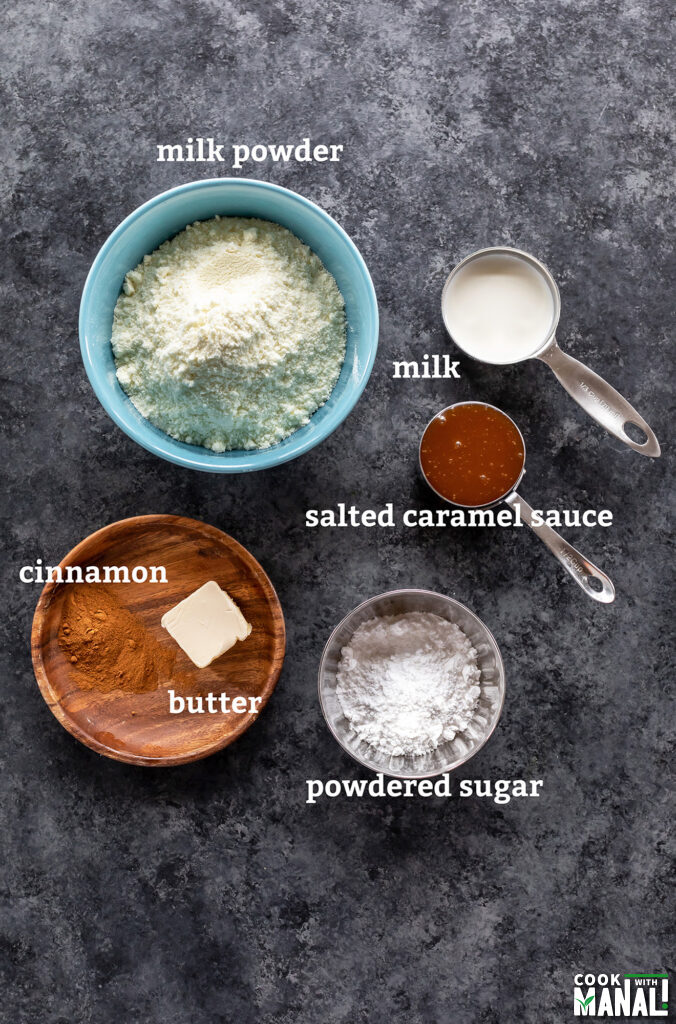
Salted Caramel Sauce: these burfis are sweetened with salted caramel sauce. You can make the sauce at home (recipe below) or you can also buy a bottle of salted caramel from store.
Milk Powder: I like using Nestle NIDO’s milk powder for all my burfis. Bobs Red Mill is another good one. Please use full fat milk powder for burfis. I do not recommend the non-fat dry milk that you can find at a lot of grocery stores. It’s just not good for making burfis.
Cinnamon powder: I have always loved the flavor of cinnamon and salted caramel together. If you are not a fan, you can skip it or use vanilla in place.
There’s also some butter and milk. And powdered sugar (not to be confused with granulated sugar, I am talking about icing sugar/confectioners sugar here) is optional. You may add it to if the sauce isn’t sweet enough for the entire batch of the burfi. The powdered sugar also gives the burfi a better texture so I usually add it.
Step by Step Instructions
First step is to make the salted caramel sauce. Skip these steps if using store bought sauce. For more detailed information and tips on homemade salted caramel sauce, please refer to my post on salted caramel sauce.
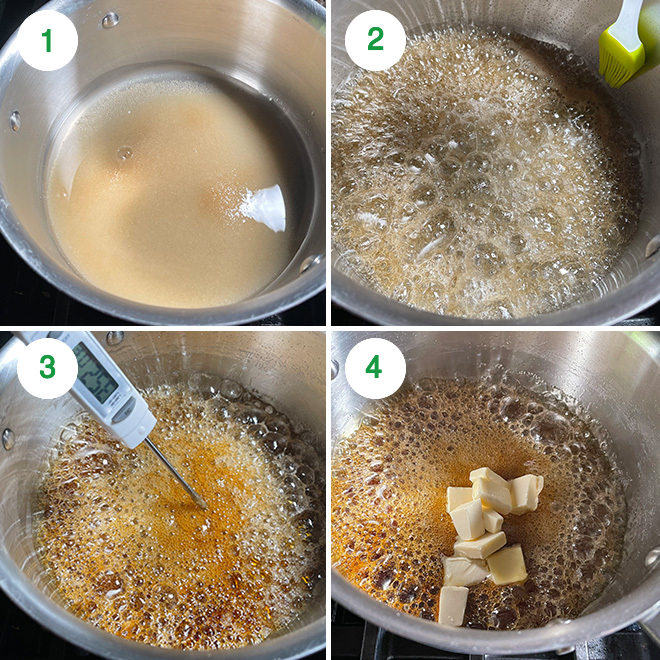
1- To a pan with long sides (this is important), add 1/4 cup water and 3/4 cup sugar (150 grams). Set heat to medium-high.
2- As the mixture simmers, the sugar will dissolve. Take a pastry brush, dip it in water and keep brushing the sides as the mixture bubbles. This will help prevent crystallization.
3- As the sugar melts, it will start caramelizing. It will become light brown in color first and then turn to a deep brown color at around 350 F degrees. A kitchen thermometer is really useful here. If you don’t have one, just keep an eye closely, this takes anywhere between 10 to 15 minutes (after the point mixture starts boiling) depending on the how thick the pan is and how high or low the heat it.
4- As soon as the thermometer reads 350F, remove pan from heat. Act quickly here as caramel burns very quickly at this point. A few minutes here and there and your caramel will be black. Remove pan from heat and add 2.5 tablespoons butter (35 grams). It will bubble a lot. Whisk vigorously until the butter melts. Wear an oven mitten while doing so.
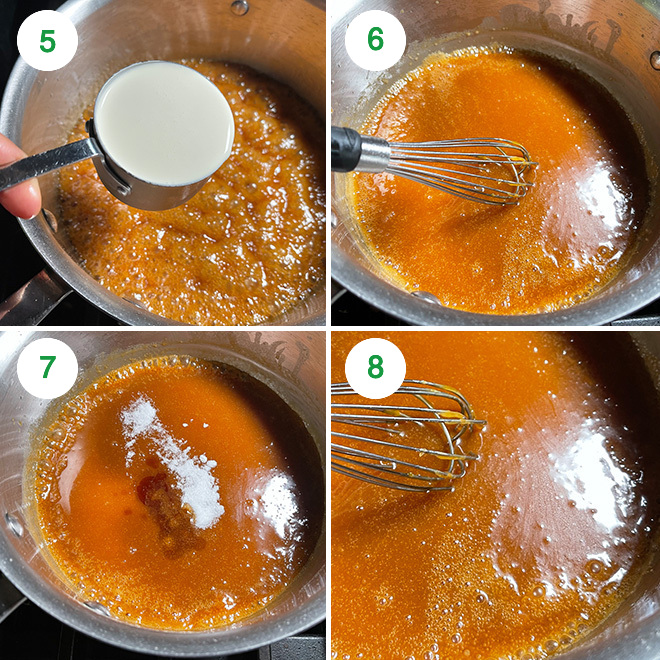
5- Then add 1/2 cup heavy cream. Again, the sauce will bubble up a lot- this is why it’s important to use a tall pan and wear gloves.
6- Mix vigorously here. Work quickly here else the sauce might clump. When you add the cream, you might feel like the sauce is clumping up, but keep mixing and it will all smooth out.
7- Add 1/2 teaspoon vanilla extract and 3/4 teaspoon sea salt.
8- Mix well and let it cool down for 15 minutes before using in the recipe.
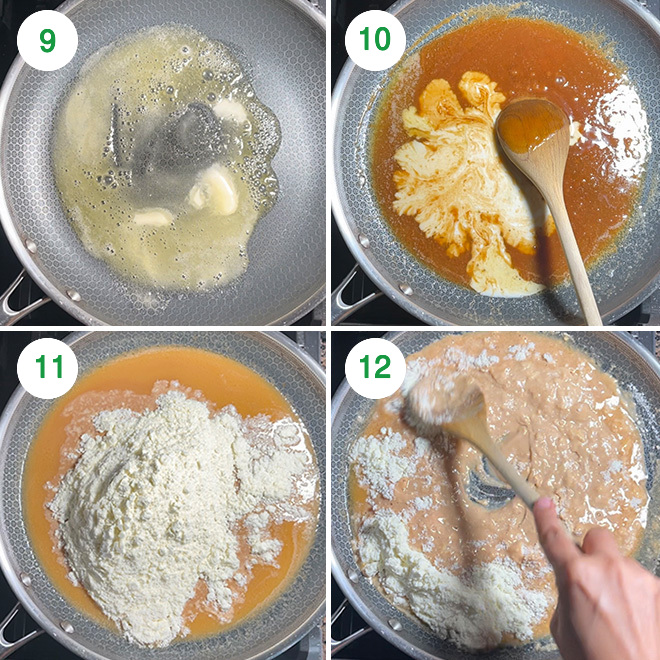
9- Before you start, line a 8 x 8 inch square pan with a lightly greased aluminum foil or parchment paper.
Add 2.5 tablespoons butter to a non-stick pan on low-medium heat. Heat will be low throughout this recipe. Let the butter melt.
10- Once the butter melts, add 1/2 cup + 1 tablespoon of the prepared salted caramel sauce and mix. Once mixed, add 1/2 cup milk and mix until it’s all well combined.
11- Add in the milk powder.
12- Start mixing the milk powder with rest of the ingredients. Heat will be low-medium at all times.
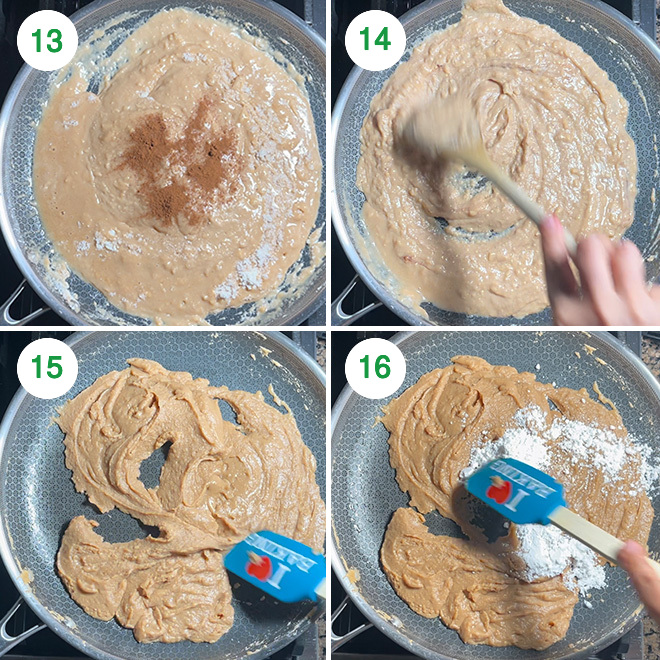
13- Once the milk powder is almost combined, add in the cinnamon powder.
14- Keep cooking the mixture on low heat.
15- After around 5 minutes on low heat, it will start leaving the sides of the pan.
16- Add powdered sugar (if using) at this point and mix. Keep cooking the mixture on low heat.
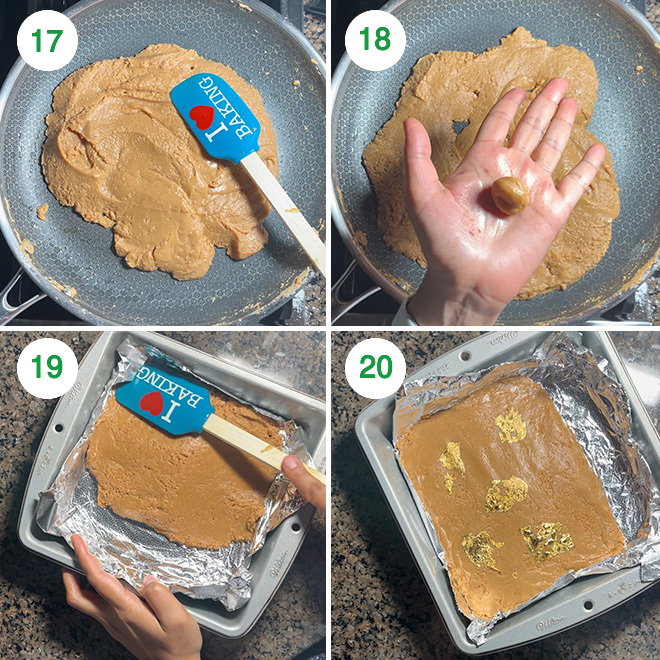
17- After cooking for around 9 to 11 minutes on low heat (time will vary depending on the thickness of the pan and intensity of heat), the dough will become non-sticky. You will notice that the dough is not sticking to the spatula at all.
18- To see it the dough is ready, take a small mixture from the pan. Let it cool down a bit and then roll between your palms. If you can roll it easily and make a non-sticky ball, it means the dough is ready to set. Remove pan from heat.
19- Transfer to prepared 8 x 8 inch square pan and press down the dough using your spatula. I didn’t spread the dough through the entire pan as I wanted thicker pieces of the burfi.
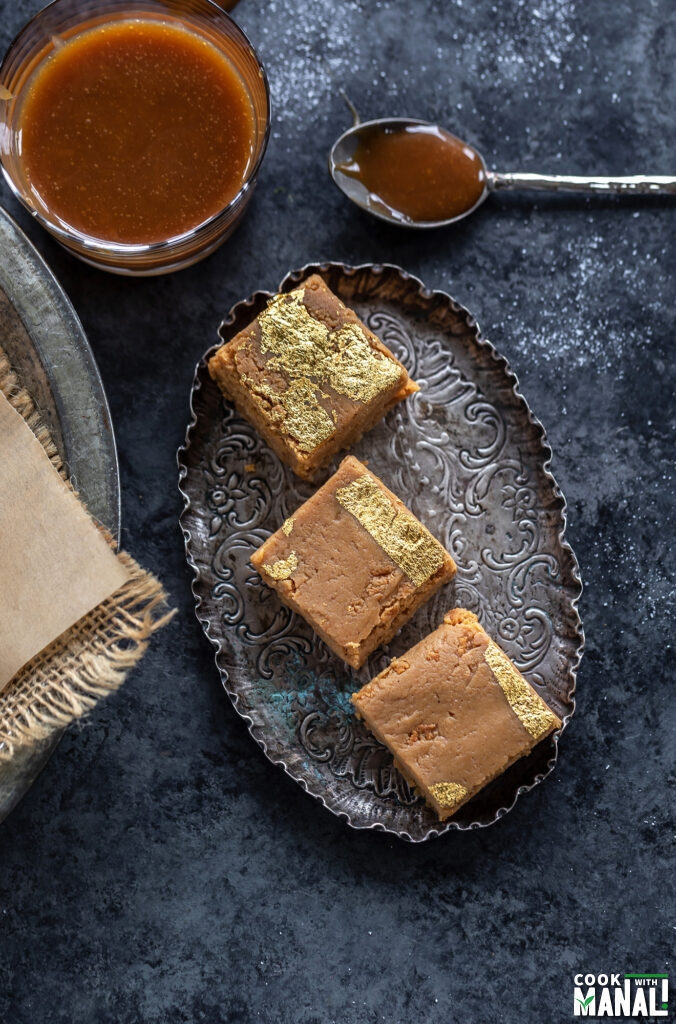
20- Apply golden edible silver leaves (if using) and let the burfi set for 2 to 3 hours at room temperature. Once set cut it into pieces (any size you want) and enjoy!
Using Shortcut
If you don’t have time or don’t want to put in efforts to make salted caramel sauce at home, just get one from stores. It’s totally fine to save time during festivals.
Most grocery stores have it in the section where they have all their ice cream toppings. You might need to reduce the amount of salted caramel sauce in the recipe if the store bought sauce is too sweet.
Leftover Salted Caramel Sauce
If you make the sauce at home following this recipe. You will be left with some salted caramel sauce as we don’t use all of in the burfis. Here are some fun ways to use it-
- Add it to your pancakes as in this Banana Pecan Pancakes with Salted Caramel.
- Make Salted Caramel Mocha.
- Apple Salted Caramel Scones.
- Make Salted Caramel Lava Cakes.
Tips & Notes
- Add powdered sugar if your salted caramel sauce isn’t sweet enough. I usually do add it because it adds to the texture of the burfi (since it has cornstarch mixed in it).
- The burfi mixture might taste quite sweet in the beginning. But as it cools and hardens, the sweetness level goes down.
- You can decrease the amount of salted caramel sauce if you prefer a less sweeter burfi. However reducing the sauce also means less of the salted caramel flavor. I would say don’t go below 1/3 cup.
- Cook this burfi on medium low heat at all times. After you add the milk powder and cinnamon, cook the mixture on low heat at all times until it becomes non-sticky and you are able to roll it into a non-sticky ball.
- If you have never made salted caramel sauce at home, please refer to my post on homemade salted caramel sauce for more details on the process.
If you’ve tried this Recipe then don’t forget to rate the recipe! You can also follow me on Facebook, Instagram to see what’s latest in my kitchen and on YouTube to watch my latest videos.
Salted Caramel Cinnamon Burfi
Ingredients
Salted Caramel Sauce
- 3/4 cup granulated white sugar 150 grams
- 1/4 cup water 2 oz/60 ml
- 2.5 tablespoons unsalted butter 35 grams
- 1/2 cup heavy cream 4 oz/120 ml
- 1/2 teaspoon vanilla extract
- 3/4 teaspoon sea salt
Salted Caramel Burfi
- 2.5 tablespoons unsalted butter 35 grams
- 1/2 cup + 1 tablespoon salted caramel sauce may use 1 to 2 tablespoons less sauce for a less sweeter burfi
- 1/2 cup milk I used whole milk
- 2 cups milk powder 200 grams, full fat, I use Nestle NIDO
- 1/2 teaspoon cinnamon powder
- 2 tablespoons powdered sugar optional, also known as icing sugar/confectioners sugar, 15 grams
Instructions
Make the Salted Caramel Sauce
- First step is to make the salted caramel sauce. Skip these steps if using store bought sauce. For more detailed information and tips on homemade salted caramel sauce, please refer to my post on salted caramel sauce. To a pan with long sides (this is important), add 1/4 cup water and 3/4 cup sugar (150 grams). Set heat to medium-high. As the mixture simmers, the sugar will dissolve. Take a pastry brush, dip it in water and keep brushing the sides as the mixture bubbles. This will help prevent crystallization.
- As the sugar melts, it will start caramelizing. It will become light brown in color first and then turn to a deep brown color at around 350 F degrees. A kitchen thermometer is really useful here. If you don't have one, just keep an eye closely, this takes anywhere between 10 to 15 minutes (after the point mixture starts boiling) depending on the how thick the pan is and how high or low the heat it.
- As soon as the thermometer reads 350F, remove pan from heat. Act quickly here as caramel burns very quickly at this point. A few minutes here and there and your caramel will be black. Remove pan from heat and add 2.5 tablespoons butter (35 grams). It will bubble a lot. Whisk vigorously until the butter melts. Wear an oven mitten while doing so.
- Then add 1/2 cup heavy cream. Again, the sauce will bubble up a lot- this is why it's important to use a tall pan and wear gloves. Mix vigorously here. Work quickly here else the sauce might clump. When you add the cream, you might feel like the sauce is clumping up, but keep mixing and it will all smooth out.
- Add 1/2 teaspoon vanilla extract and 3/4 teaspoon sea salt. Mix well and let it cool down for 15 minutes before using in the recipe. We will not be using all of the sauce in the burfi.
Make the burfi
- Before you start, line a 8 x 8 inch square pan with a lightly greased aluminum foil or parchment paper. Add 2.5 tablespoons butter to a non-stick pan on low-medium heat. Heat will be low throughout this recipe. Let the butter melt.
- Once the butter melts, add 1/2 cup + 1 tablespoon of the prepared salted caramel sauce and mix. You can reduce 1 to 2 tablespoons of the sauce here if you want to reduce sweetness. Once mixed, add 1/2 cup milk and mix until it's all well combined.
- Add in the milk powder. Start mixing the milk powder with rest of the ingredients. Heat will be low-medium at all times.
- Once the milk powder is almost combined, add in the cinnamon powder. Keep cooking the mixture on low heat.
- After around 5 minutes on low heat, it will start leaving the sides of the pan.Add powdered sugar at this point (if using) and mix. Keep cooking the mixture on low heat.
- After cooking for around 9 to 11 minutes on low heat (time will vary depending on the thickness of the pan and intensity of heat), the dough will become non-sticky. You will notice that the dough is not sticking to the spatula at all.To see it the dough is ready, take a small mixture from the pan. Let it cool down a bit and then roll between your palms. If you can roll it easily and make a non-sticky ball, it means the dough is ready to set. Remove pan from heat.
- Transfer to prepared 8 x 8 inch square pan and press down the dough using your spatula. I didn't spread the dough through the entire pan as I wanted thicker pieces of the burfi. 20- Apply golden edible silver leaves (if using) and let the burfi set for 2 to 3 hours at room temperature. Once set cut it into pieces (any size you want) and enjoy these Salted Caramel Cinnamon Burfi!
Notes
- Add powdered sugar if your salted caramel sauce isn’t sweet enough. I usually do add it because it adds to the texture of the burfi (since it has cornstarch mixed in it).
- The burfi mixture might taste quite sweet in the beginning. But as it cools and hardens, the sweetness level goes down.
- You can decrease the amount of salted caramel sauce if you prefer a less sweeter burfi. However reducing the sauce also means less of the salted caramel flavor. I would say don’t go below 1/3 cup.
- Cook this burfi on medium low heat at all times. After you add the milk powder and cinnamon, cook the mixture on low heat at all times until it becomes non-sticky and you are able to roll it into a non-sticky ball.
- If you have never made salted caramel sauce at home, please refer to my post on homemade salted caramel sauce for more details on the process.
- The prep time of 15 minutes is the time taken to make the salted caramel sauce. If using store bought salted caramel sauce, then the prep time is only gathering all the ingredients together.
Nutrition
Nutrition information is automatically calculated, so should only be used as an approximation.





Nice recipe, I will definitely give a try.
Hi Manali , does Amul cream will work here
it should!
H
Can we use dulche de leche instead of salted caramel sauce?
Thanks
yes!